
|
|
By Todd
Ogasawara, Mar. 14, 2001
Copyright 2002 Todd Ogasawara
If you want something done right, you have to do it yourself. HanDBase can
help you create data-driven applications that custom fit your specific
requirements.
DDH Software HanDBase for the Pocket PC
HanDBase can’t do everything, but it comes pretty close.
English
Part I of this article defined some of the HanDBase features you can use to build your own database. It also defined the record for a HanDBase applet that can help me identify and track my writing projects for PocketPC.com. In Part I of this article you can also find a definition of the fields that define the record structure for the data I plan to use.
Figure 1 shows the definition of our simple first field: ArticleNum. I typed in ArticleNum in the text box at the top of the screen to give it its name. Next I defined the field type as Integer (a whole number in Field Type). The Pixels Shown value lets you set the width of the displayed field. The Visible and Export/Print check boxes are checked by default. You should leave them like that. The Edit Pop-ups option is not used for this field. You can always come back and modify any of these field settings later. So, while planning is essential in designing your database applet, it does not mean that you cannot change your mind and design later.
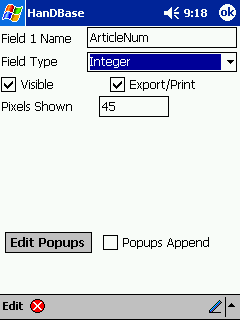 Figure 1. Defining an integer field. |
Figure 2 shows how I defined the second field in the record: Section. You can see the Field Type menu pulled down to reveal most of the 16 available field types. The Section field has a set number of possible values (text descriptions in this case). So, I chose to use the Pop-Up field type here. This lets me enter the fixed set of descriptions just once and then choose one from a drop-down menu as needed.
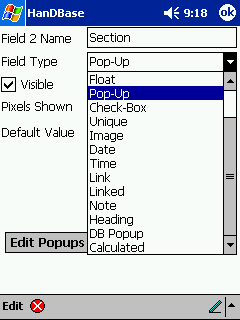 Figure 2. Defining a Pop-up field. |
Figure 3 shows the completed definition for the Section field. It is similar to the definition for ArticleNum. However, you can see an additional defined characteristic here named Default Value. Once you define the fixed set of values for the Pop-Up (pull-down) menu, you can designate one of those values as the one that is first shown when entering data. At this point, there are not any data associated with this field, so there is nothing to define as a default value except the given No Value.
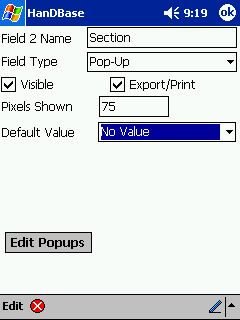 Figure 3. A completed Pop-up field. |
I tapped the Edit Popups button in Figure 3. This brings up a new screen that lets you define the values that populate the Section field. Figure 4 shows the values I typed in to populate the Section field. I did this by tapping the New button seen in Figure 4 and typing in one menu item at a time. You can also choose to have the items sorted by checking the Sort Popups check box.
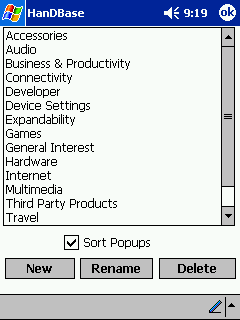 Figure 4. Defining the values of a Pop-up field. |
Now that we have entered our set of fixed values for the Section field, you can see in Figure 5 that I selected General Interest as the default value that is entered in that field for any new record added to the database.
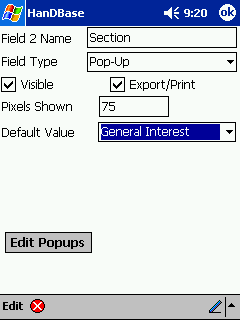 Figure 5. Defining the default value of a Pop-up field. |
The process of defining each field is repeated for each of the remaining seven fields in my article-tracking database. Each field type has its unique set of options and features. It is beyond the scope of this article to go into details for each one. I recommend that you refer to the HanDBase documentation for that information. I will mention, however, that HanDBase provides a powerful set of tools to deal with each possible field type. The Date field, for example, lets you embed the familiar month view pop-up that you usually see embedded in Microsoft® Pocket Outlook® Calendar. It lets you choose a date by tapping on a day of the month. This is one of many great timesaving features in HanDBase.
Figure 6 shows you the completed data entry form for my article-tracking HanDBase applet. Notice that the Type and Section fields have the pull-down menus (called Pop-ups) that we defined earlier. The Title and Comments fields are both simple text fields that let us enter up to 60 characters each. Notice that both have vertical scroll bars that let us see all the entered text if there is more text than fits in that fixed-sized text entry box.
The Start Date, Draft Date, and Final Date (obscured from view) fields each let you bring up a month view calendar to let you easily enter or change the date value. If no date is entered in a Date field, the check box is unchecked and you will see the value NO DATE in the normal applet view. You cannot see the final Completed field in this screen. However, it is a simple check box that you can tap to check or uncheck.
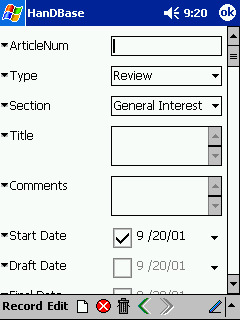 Figure 6. The completed article-tracking applet record-entry screen. |
Figure 7 shows some of the powerful features available in the Record menu. Note that you can even print (if the appropriate driver is installed on your Pocket PC) or wireless transfer a record to another Pocket PC or even a Palm OS–based device.
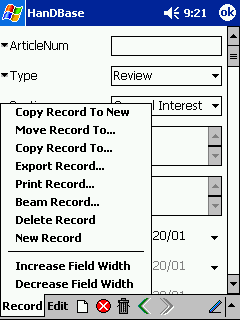 Figure 7. Record options. |
Finally, Figure 8 shows you the main screen of our database. Each record is shown on a single line. You can scroll across to see the entire record. You can also tap on a record to bring up the detailed view we saw in Figure 6. You can temporarily adjust the field size by clicking and dragging any line between the field names. You can permanently change them by modifying the Pixels Shown value in the field definition.
The Actions menu includes many powerful features including the Filter feature that lets you view a subset of your data by telling HanDBase what you want to see based on specific values or value ranges in a particular field.
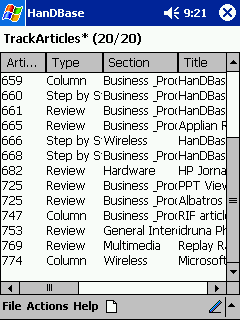 Figure 8. The running article-tracking applet. |
Quite honestly, I have not done justice to the rich set of features HanDBase gives you. However, I hope I have shown you that anyone can use even the small subset of features I highlighted to quickly design, build, and use an incredibly useful HanDBase applet that is custom designed for your particular task. More importantly, I did not have to write a single line of software programming code to build an applet with pull-down menus, a pop-up calendar date chooser, vertical scroll bars, printing, and wireless infrared file transfers.
I recommend that you spend some time experimenting with the other features and options to see which ones are useful to you. Then, choose a reasonably simple but important task to build your first HanDBase applet. You can always go back and redesign it to use more complex features as you learn more about HanDBase.